Day 1- 12th February 2015
The day dawned bright and fair and I got the car all packed up with my fibres and equipment and headed over to Resolis - the name means "sunny slope". Once everything was unloaded, the new recruits from the friendship groups started to appear and we set to work. The first thing was to explain what we hoped to achieve - it was easier this time round because I had the benefit of the finished wallhanging from the previous group. You can click here to read about how the first one was made.
Then it was down to choosing colours. Each person chose two - one dark and one bright/light to contrast with it. As there are lots of colours to choose from, this took a fair amount of time.
 Then, we laid out bubblewrap and started laying down the darker fibres. Then the second layer went on top with the fibres running at right angles to those of the first layer.
First we pressed to spread the water through the fibres, and then we started rubbing.
We didn't have quite enough space around the table - so Wendy was relegated to the kitchen! She helped with the previous wallhanging so she knew what she was doing and was quite happing pottering away by herself.
 Throughout the day I was taking loads of photographs - far too many to show here, so I have put them all onto a web album which can be accessed by clicking here.
After a few minutes of rubbing, we all turned over our bubblewrap & felt sandwiches and started rubbing from the other side.
At this stage, we were just making "half-felt" - this involves felting just enough to hold the fibres together to allow us to cut out shapes, but for the fibres still to be loose enough to be felted onto a background piece which we would make on the next day.
 We needed 4 more pieces of felt to have enough for our design, so some went through to the kitchen to work on these while the rest of us lowered the felting table to sitting height, dried it off and started tracing through our designs.
Once all the designs were ready, we laid them all out in position on the table and allocated different colours for each design.


By the end of the day it was all ready and we were able to lay out all the cut pieces on the master plan. Of course we changed our minds about what would go where, but eventually we had it all arranged to our satisfaction.
Day 2 - 17th February 2015
A wild day this time - very windy, but some sunshine in amongst the squalls. The table was quickly set up at standing height, covered with a layer of bubblewrap and on top of this a layer of icewool. This helps to give strength to the wallhanging and means that there can be no danger of thin parts.
Then we started laying down white merino wool fibres starting in the middle and working outwards.
 Once the first layer was complete, we started on a second layer, with the fibres running perpendicular to the first layer. This is trickier when you are putting white on white - not so easy to see where you have been, so once we thought it was all okay, we went over it with our fingertips searching for thin spots.
Next part was more fun - adding some decorative bits and pieces to add some interesting texture to the surface rather than just a bland white sheet.

Each person chose a different thing and we rotated around the table adding our bits and pieces.

Much more interesting than just white!
 Then, we wet the whole thing down with warm soapy water - lots of soapy water! It took about 10 litres of water to wet down our 4ft by 8ft area of fibres.
Then it was covered with another sheet of bubblewrap and the hard work began.

We spread out the water until everything was wet and then started rubbing....... and rubbing.........and rubbing.

This part is where it really pays to have a group of people working together - especially with someone like Clive on the team. He has a long reach and big hands - and covered twice as much area as everyone else!


 Not only was he great for rubbing, but he had baked a delicious fruit cake and we all enjoyed our break!
Suitably refreshed, we positioned our cut-outs from the previous session and then started snipping through the top layers to expose the darker colour at each intersection in the knotwork. This helps to give the impression of the "overs & unders" which are typical of Celtic knotwork.
Then, bubblewrap back on and more rubbing - this time it had to be really serious rubbing as we had to get the cut-out pieces to felt onto the background felt.


And then it was time to pack up and go home.
Day 3 - 19th February 2015
Another blustery day. This time the table was set up at its lowest position to make it better to sit at. The task for the day was needlefelting.On the previous day we had agreed on wording for the centre panel and I had come with stencils cut out ready for us to use.

The selected text is :
"Like the sun, let your warmth embrace everyone.
Like the moon, let your anger appear slowly"


We went through quite a lot of needles while people got used to the method.
 Because of the area we were using expanded polystyrene as our base for needle felting. To get this area of polystyrene involves using builders quality - good in terms of it doesn't disintegrate too quickly while you are working, but it des have the odd hard lump that makes it difficult for the needle to penetrate and causes breakages.
However - I had brought a good supply with me and we were not in danger of running short.
Clive had baked another cake so we had a teabreak!

 It is not really good practice to have our food and drink on top of the felt - but it was all on top of the sheets of polythene we were using to stop our clothes getting damp as we leaned on the damp felt.
This was the day that is the normal meeting day for the whole of the Friendship Group so at lunchtime we had to dismantle the table and move it through to the main hall, leaving the smaller room free for the club meeting.
After some lovely lentil soup provided by Lynne and David we got it all set up again and invited the other members of the club to come and watch us at work - and indeed to join in.

They seemed very interested to see what we were doing.
The rest of the afternoon was spent doing more of the needlefelting detail. We were working a bit slower because it was colder in the main hall!
 You can see from this photograph of one of the knotwork panels which had been part done just how worthwhile it is spending time needlefelting the detail.
By the end of the session we were happy with progress and stood back to have a good look.

To read about the first wallhanging made by the volunteers from Groam House Museum, click here.
Day 4 - 24th February 2015
Today was another squally day - nasty sleety rain, but interspersed with the occasional sunny spell. We got the table set up and the felt in place ready for the day's work which was more needlefelting ......... all day stabbing at the felt to add detail to our wallhanging. A task over the weekend was to cut out the designs for the two Pictish symbols that had to be added to the felt above and below the text. This was done on my laser cutting machine, but the felt for the Crescent & V-rod symbol was too thick and the cuts didn't go right through to the back. To complicate things, the laser cutter chose that time to break down! Fortunately it was a relatively simple fix - just re-soldering a broken wire. However, it meant the rest of the cutting had to be done by hand. We were joined today by my granddaughter, Rachel, who is in her final year at school and on Tuesdays comes to my studio for work experience. She spent the first half hour or so carefully cutting out the rest of the intricate Crescent and V-rod symbol. The particular design we chose is that on the large cross slab stone housed in Groam House Museum.

Needle felting by hand is a slow process and the whole day was spent doing this. The pictish symbols had to be needled all over while the knotwork panels only needed to have the borders of the lines picked out in contrasting colours. Although time consuming, it was worth the investment of both time and energy.


By the end of the day we had almost finished. We still have a little bit of detail to add to two of the knotwork panels, but it will only take another 30 minutes or so of stabbing at the start of our next session.


Day 5 - 26th February 2015 - The Final Day
The day dawned fair and bright - clear blue skies and just a gentle breeze - a promise that spring might be just around the corner. It didn't last! However, we did get all the gear transferred from the car into the hall in good weather.
We set up the table for sitting height as the morning's workload was to finish the needlefelting. There was just a little bit of detail to be completed in one corner

 I have finally figured out how to transfer movie clips from my camera to the computer so I took a few short bursts of video. It gives you a flavour of how our group worked - not much concentration needed on this occasion so conversation was free-flowing. - click here to see the video.
 After about 45 minutes of stabbing on the front - and occasionally checking how much was coming through to the back, we turned the felt over and gave it the same treatment from the back. This ensures that everything would be fully held in place for the final stage.
Lunch consisted of another lovely soup provided by Lynne and David - broccoli and stilton - plus whatever people had brought in the way of sandwiches etc.


 We took off the bubblewrap and rubbed gently with our hands direct onto the felt - just a final massage that allows us to feel how firm the felt is becoming. Then we replaced the bubblewrap and turned the whole sandwich over

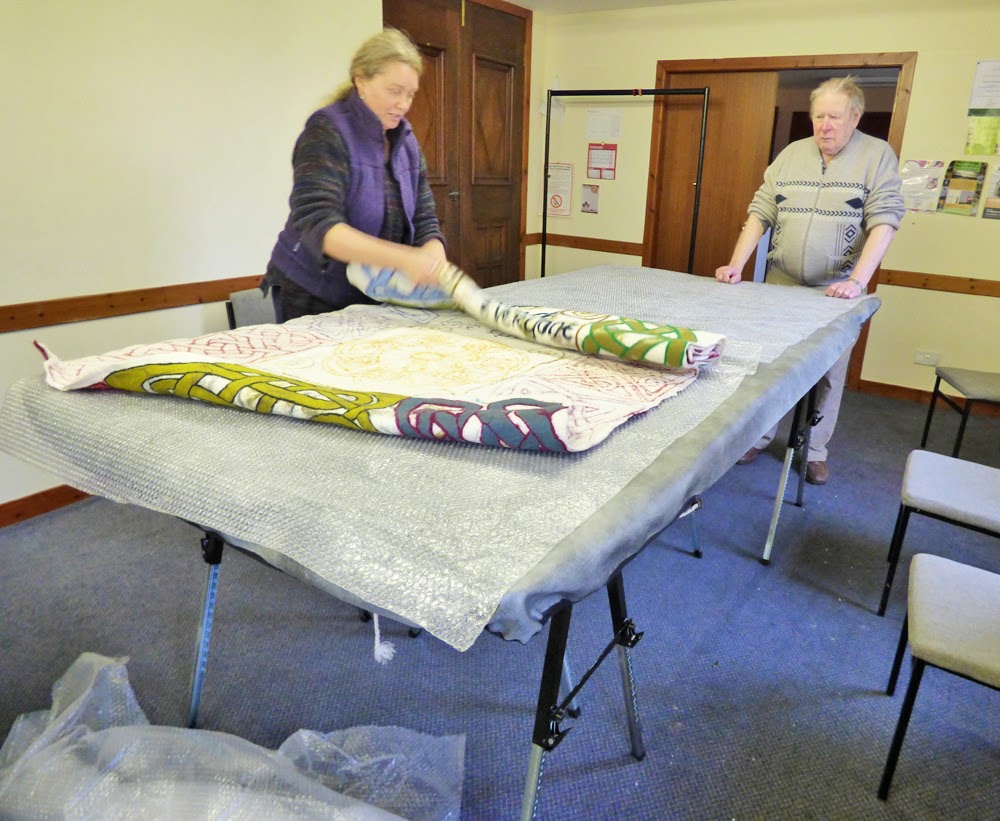
and repeated the procedure on the front. We probably spent about an hour doing this final rubbing session and then it was time for the serious physical effort - the felt has to be rolled.
Felt will always shrink in the direction of rolling, so it needs to be done in different directions.
 We started working from one end using two four foot wide blinds end to end, and worked in pairs, good strong rolls to a count of 50 before opening out and rolling from the other end - repeated four times.
 The widest bamboo blind I have ever been able to find is 6 feet wide, so when rolling across the width of our four feet by eight feet piece we needed to use two blinds side by side, and to stop the roll bending and falling apart, this was supplemented by two four feet wide blinds on top of the felt - a rather fat, unwieldy roll but our teams of 4 handled it admirably. again rolled first from one side and then the other.
By the time we had done all this rolling, we had brought the width down by about 4 inches and the length was reduced by 6 inches.
Then it was time to stand back and admire our handiwork. We pinned a fabric tube onto the back of the top edge into which we slid the top bar of a clothes rail. It is not quite tall enough but it stills gives a better impression than when it is lying flat on the table.

Didn't we do well!
Later that night - the final finishing
 This had to be done at home as it needs a bath to rinse out all the soapy water. A piece of felt this size is quite hard to work, and very heavy when it is soaking wet, so the easiest thing is to paddle it in the bath with my feet. It took 4 bathfuls of hot water before it was running clear. As each rinse was squeezed out I could feel the felt firming up - a sure sign that everything had gone according to plan. It dripped into the bath overnight and then the next day - once again bright and this time a good breeze - we spread it out over the table in the garden and let it dry off some more, then a final hanging up over the banister until it was fully dry a couple of days later.
This will eventually go on display along with the panel made in January by the volunteers from Groam House Museum and with the three that have still to be made. Watch this space........!
Did you enjoy reading about this? - or if you are one of the participants, did you enjoy making the felt? - please give your comments by clicking in the comments space below.